

Table of Contents
What is WordPress?
It’s important to understand how to create a website by own, but it’s also equally important to understand how to start your own website with WordPress or how to create website using WordPress. So, let’s understand first Wha is WordPress? WordPress is a popular content management system (CMS) that allows users to create and manage websites without requiring extensive technical knowledge. It is an open-source platform that is free to use and offers a range of features and plugins that can be used to customize the website’s appearance and functionality. WordPress was originally designed as a blogging platform but has since evolved into a versatile CMS that can be used to create websites of any type, from e-commerce stores to portfolios and business websites. It is estimated that WordPress powers around 40% of all websites on the internet, making it the most widely used CMS in the world.
WordPress is a self-hosted platform, which means that users need to have their own web hosting and domain name to set up a WordPress website. Once a user has set up their hosting and domain name, they can install WordPress and begin customizing their website using a variety of free and premium themes and plugins. WordPress offers a user-friendly interface that makes it easy for beginners to get started, but it also has a range of more advanced features that make it a powerful tool for web development professionals. Overall, WordPress is a flexible and scalable platform that can be used to create a wide range of websites, from simple blogs to complex e-commerce stores.
Importance of having a website
In today’s digital age, having a website is essential for individuals and businesses alike. It provides a platform for showcasing your brand, products, services, and ideas to a wider audience, and helps you establish an online presence. Here are some specific reasons why having a website is important:
- Reach a wider audience: With a website, you can reach potential customers or readers beyond your immediate geographic location, expanding your reach and increasing your visibility.
- Establish credibility: A website can help establish credibility and professionalism for your brand or business, making it easier for potential customers to trust and do business with you.
- Control your online presence: By having your own website, you can control your online presence and reputation, ensuring that your brand is presented consistently across all platforms.
- Provide information: A website serves as a central hub for providing information about your products, services, and ideas, making it easy for visitors to learn more about what you have to offer.
- Build relationships: A website can help you build relationships with your audience through blog posts, social media integration, and other interactive features.
Having a website is crucial in today’s digital landscape for anyone looking to establish an online presence, reach a wider audience, and grow their Personal brand or business.
Benefits of using WordPress for website creation
WordPress is a popular content management system (CMS) that powers over 40% of all websites on the internet. There are several benefits to using WordPress for website creation, including:
- Free and open-source: WordPress is a free and open-source platform, meaning you can download, use, and modify it as you wish as per it’s license.
- Ease of Use: WordPress is user-friendly and easy to learn, even for beginners. It has a simple and intuitive interface that allows users to create and manage their websites easily.
- Customizability: WordPress offers a wide range of customization options, including thousands of themes and plugins, that enable users to customize the look and functionality of their website to their exact specifications.
- SEO-friendly: WordPress is designed with search engine optimization (SEO) in mind, making it easy to optimize your website’s content and structure to rank higher in search engine results pages (SERPs).
- Scalability: WordPress is highly scalable and can handle websites of all sizes, from small blogs to large e-commerce websites.
- Community Support: WordPress has a large and active community of users and developers who contribute to its development, provide support, and create plugins and themes to extend its functionality.
- Cost-effective: WordPress is free and open-source software, which means users can use and modify it without paying any licensing fees. Additionally, many themes and plugins are available for free, reducing the overall cost of website development.
- Integration-friendly: WordPress integrates seamlessly with a range of third-party tools and services, such as Google Analytics and social media platforms.
- Multilingual: WordPress supports multiple languages, allowing you to create a website that caters to an international audience.
- Mobile-responsive: WordPress websites are designed to be mobile-responsive, ensuring they display correctly on a range of devices and screen sizes.
- E-commerce ready: WordPress offers several e-commerce plugins, including WooCommerce, which allows you to easily set up an online store.
- Secure: WordPress takes security seriously and offers regular updates and security patches to keep your website safe.
Setting Up the Environment

Choosing a domain name and web hosting space
When starting a website with WordPress, the first step is to choose a domain name and a web hosting provider. The domain name is the web address that people will use to access your website, while web hosting refers to the service that allows your website to be stored on the internet.
Here are some things to consider when choosing a domain name and web hosting provider for your WordPress website:
- Choose a domain name that is memorable and easy to type.
- Make sure your domain name is unique and not already in use.
- Consider using keywords in your domain name that relate to your website’s content.
- Keep your domain name short and simple to remember.
- Choose a web hosting provider that has good uptime and reliability.
- Look for a web hosting provider that offers easy WordPress installation.
- Make sure your web hosting provider offers sufficient storage and bandwidth for your website’s needs.
- Check if your web hosting provider offers good customer support.
- Consider the pricing and plans offered by the web hosting provider.
- Look for a web hosting provider that offers security features, such as SSL certificates and regular backups.
- Check if your web hosting provider offers a user-friendly control panel for managing your website.
- Consider the scalability and flexibility of your web hosting plan, in case you need to upgrade in the future.
Installing WordPress Manually

Installing WordPress is a crucial step in creating a website with this platform. It’s a straightforward process, and there are different ways to go about it. Here are some points to consider when installing WordPress:
- Check the server requirements: Before installing WordPress, ensure that the server meets the minimum requirements. These include Recommend PHP 7.4 or greater and MySQL 5.7 or MariaDB version 10.3 or greater & HTTPS support. Most of the top hosting providers for self-hosted WordPress will support this requirement, if you are going for VPS or a dedicated server, ensure you are installing the minimum requirement as per above.
- Choose a hosting plan: WordPress can be self-hosted or hosted through a hosting service. You’ll need to choose a hosting plan that suits your needs and budget. Some popular hosting services for WordPress include Bluehost, SiteGround, and WP Engine. We recommend Bluehost for your hosting needs, they will provide you with a WordPress hosting plan with a heavy discount when you click on the below link along with a free domain.
Create a database: To install WordPress, you need to create a database. This can be done through cPanel, Plesk, or any other control panel provided by your hosting service or for a dedicated server / VPS following the below method.
When creating a WordPress website without cPanel, you can still use MySQL to create the necessary database and user for WordPress installation. Here are the steps to create a database and user using the MySQL client:
- Install the MySQL client: To use the MySQL client, you must first install it on VPS/dedicated server. This can be done by downloading and installing the MySQL client software from the official MySQL website.
- Access the MySQL client: Once the MySQL client is installed, you can access it by opening the terminal or command prompt on VPS/dedicated server and entering the command to start the MySQL client.
- Login to MySQL: After accessing the MySQL client, you will need to login with your MySQL username and password. This will grant you access to the MySQL command prompt.
- Create a new database: To create a new database, use the following command:
CREATE DATABASE database_name;Replace “database_name” with the name of the database you want to create.
• Create a new user: To create a new user, use the following command:
CREATE USER 'username'@'localhost' IDENTIFIED BY 'password';Replace “username” and “password” with the desired username and password for the new user.
- Grant privileges to the new user: To grant privileges to the new user for the database you created, use the following command:
GRANT ALL PRIVILEGES ON database_name.* TO 'username'@'localhost';Replace “database_name” and “username” with the names you used when creating the database and user.
• Exit the MySQL client: After creating the database and user, exit the MySQL client by using the following command:
exit()Once you have created the database and user using the MySQL client, you can proceed with the WordPress installation process. When prompted for the database information during the installation process, enter the database name, username, and password that you created using the MySQL client.
- Download WordPress & uncompress the files:
Download: You can download WordPress for free from the official website. Once downloaded, extract the files to a folder on the server or VPS or dedicated server.
You can use the below command to download the files directly from WordPress.org
wget https://wordpress.org/latest.zipor
curl -LO https://wordpress.org/latest.zip uncompress and move files to document root or web folder
Assuming that public is your web folder / or document root, you will get this information when you configured your webserver or installed a webserver.
unzip latest.zip
mv wordpress public
- Upload the files: Follow this step only if in the above steps you have downloaded and extracted files on your local system, if you have downloaded and extracted the files on the server directly you can safely skip this step. Upload the extracted files to your hosting account using an FTP client or through File Manager.
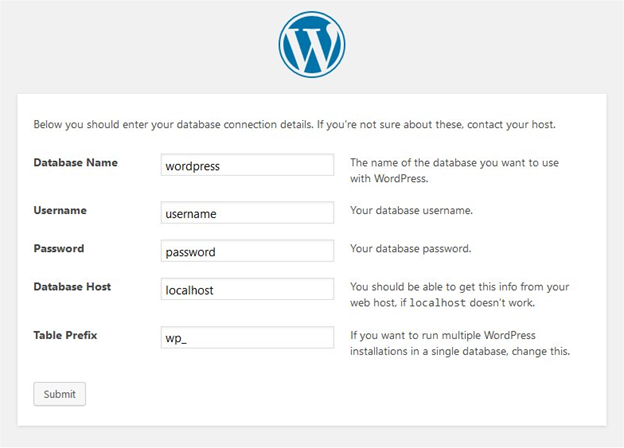
- Run the installer: Once the files are uploaded, run the WordPress installer by visiting your website’s URL. Follow the prompts and enter the necessary information, such as your database name, username, and password.
The WordPress dashboard an overview
The WordPress dashboard is the central control panel for managing a WordPress website. Once you log in to your WordPress site, you will be directed to the dashboard.
The WordPress dashboard consists of several sections that allow you to manage different aspects of your website. Here is an overview of some of the main sections of the WordPress dashboard:
- Admin Menu: The admin menu is located on the left-hand side of the dashboard and contains links to different sections of the dashboard, such as Posts, Pages, Appearance, Plugins, and Settings.
- Toolbar: The toolbar is located at the top of the screen and gives you quick access to your profile, notifications, and options to add new content.
- Dashboard Widgets: The dashboard widgets provide an overview of your website’s activity, including recent posts, comments, and statistics.
- Quick Draft: The quick draft section allows you to quickly write and save a draft of a new post.
- Posts: The Posts section allows you to create and manage your website’s blog posts.
- Pages: The Pages section allows you to create and manage your website’s pages.
- Media: The Media section allows you to upload and manage your website’s images, videos, and other files.
- Appearance: The Appearance section allows you to customize your website’s design by changing the theme, adding widgets, and editing menus.
- Plugins: The Plugins section allows you to add new functionality to your website by installing and activating plugins.
- Users: The Users section allows you to manage the users who have access to your website, including adding new users and editing existing ones.
- Settings: The Settings section allows you to configure various settings for your website, including general settings, writing settings, and reading settings.
Choosing and Installing a Theme
Understanding WordPress themes
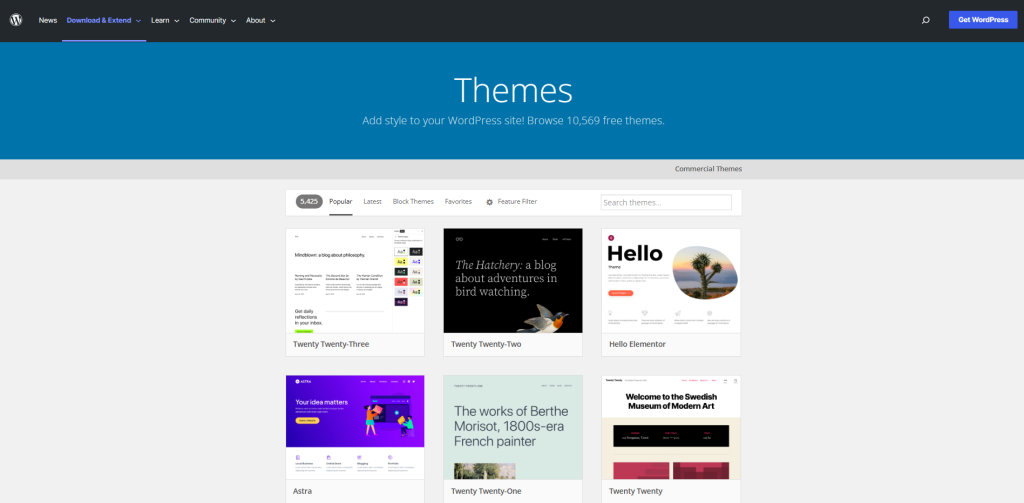
WordPress themes are pre-designed templates that are used to modify the visual appearance of a website built on the WordPress platform. There are thousands of free and premium themes available (actually 10k+ and counting) that you can choose from based on your website’s niche, industry, and style.
Themes are an important aspect of any WordPress website as they affect the design and functionality of the website. Some of the key benefits of using a theme on your WordPress website include:
- Customization: With themes, you can easily customize your website’s appearance and layout to suit your branding, preferences, and needs.
- Responsive design: A responsive theme ensures that your website looks great on all devices, including smartphones, tablets, and desktop computers.
- User experience: A well-designed theme can improve your website’s user experience by making it easier to navigate, increasing engagement, and reducing bounce rates.
- SEO-friendliness: Many WordPress themes are optimized for search engines, making it easier for your website to rank higher in search results and drive more traffic.
- Functionality: Themes can also provide additional functionality to your website, such as social sharing buttons, contact forms, and eCommerce features.
When choosing a WordPress theme, it’s important to consider factors such as customization options, responsive design, user experience, SEO-friendliness, and functionality. You can browse through the WordPress theme repository or choose from third-party marketplaces to find the right theme for your website.
Factors to consider when choosing a theme
When choosing a theme for your WordPress website, there are several factors to consider. Here are some of the most important ones:
- Purpose and content: Consider the purpose of your website and the type of content you will be creating. A theme that is designed for a blog may not be suitable for an online store.
- Customization options: Look for a theme that allows for easy customization, including the ability to change colors, fonts, and layout.
- Responsive design: Choose a theme that is responsive and will work well on all devices, including mobile phones and tablets.
- Speed and performance: Look for a theme that is optimized for speed and performance to ensure that your website loads quickly.
- Compatibility: Check that the theme is compatible with the latest version of WordPress and any plugins you plan to use.
- Reviews and ratings: Read reviews and ratings from other users to get an idea of the theme’s quality and ease of use.
- Support and updates: Look for a theme that is regularly updated and has a good support system in case you run into any issues.
- SEO optimization: Choose a theme that is optimized for search engines to help improve your website’s visibility in search results.
Installing and activating a theme
Installing and activating a theme is a simple process that can be completed through the WordPress dashboard. Here’s how to do it:
- Choose a theme: There are thousands of free and paid themes available for WordPress. Browse the WordPress theme directory or third-party marketplaces to find a theme that fits your needs.
- Download the theme: If you choose a free theme from the WordPress directory, you can download it directly from your WordPress dashboard. If you purchase a premium theme from a third-party marketplace, you’ll need to download the theme files to your computer.
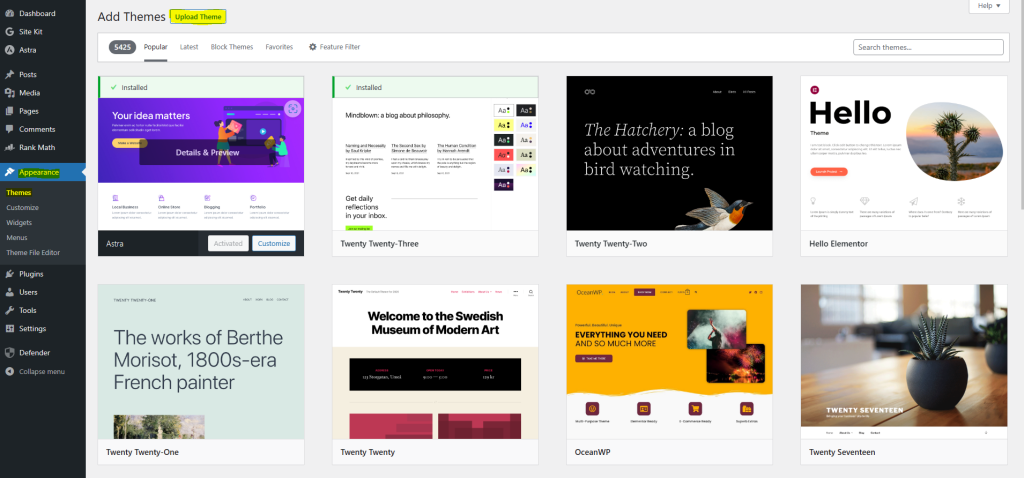
- Upload the theme: If you downloaded the theme to your computer, you can upload it to WordPress by going to Appearance > Themes > Add New > Upload Theme in the WordPress dashboard. Select the theme ZIP file and click “Install Now”.
- Activate the theme: After the theme has been uploaded, click “Activate” to make it live on your website.
Once the theme is activated, you can customize it by going to Appearance > Customize in the WordPress dashboard. From there, you can change the colors, fonts, layout, and other elements of your website’s design.
Customizing the Website
Customizing the theme
Customizing the theme is a crucial step to make your website look unique and professional. WordPress offers several customization options that allow you to modify the theme’s appearance and functionality to suit your specific needs. Here are some of the ways you can customize your WordPress theme:
- Site Identity: You can customize your site’s identity by adding a site title, tagline, and logo. You can also choose to display your site title or logo in the header or customize the header image.
- Colors: Many themes allow you to choose from a selection of predefined color schemes, or you can create a custom color scheme that matches your brand.
- Fonts: You can choose from a range of fonts for your site’s headings and body text, or you can add custom fonts using a plugin.
- Menus: WordPress allows you to create custom menus and assign them to specific locations on your site.
- Widgets: Widgets are small content blocks that can be added to the sidebar, footer, or other widget areas on your site. You can use widgets to display your latest posts, social media links, or custom content.
- Page Templates: WordPress themes come with several pre-built page templates that you can use to create custom pages for your site.
- Plugins: WordPress plugins can add additional functionality to your site, such as contact forms, sliders, and galleries.
When customizing your theme, it’s important to keep in mind the overall look and feel of your site, as well as your brand identity. Make sure that your customizations are consistent with your brand, and that they enhance your site’s functionality and usability.
Adding and editing pages and posts
Adding and editing pages and posts is an essential part of creating a website on WordPress. Here are some points to consider when working on this step:
- Pages are static elements of a website that typically provide important information about the business or organization, such as the “About Us” or “Contact” pages. To create a new page, navigate to “Pages” on the WordPress dashboard and click “Add New.” From there, you can add a title, content, and any relevant media, such as images or videos.
Creating pages
Creating pages with WordPress is an essential aspect of building a website. Pages are static pieces of content that contain information about a specific topic, and they are often used to showcase important information such as contact details, about us, or services. Here are the steps to create pages with WordPress:
- Login to your WordPress dashboard and navigate to the Pages section.
- Click the “Add New” button to create a new page.
- Add a title to your page and start adding content to the editor.
- Use the formatting options in the editor to format your content, add headings, images, and links.
- Use the permalink section on the right-hand side of the page editor to customize the URL of your page.
- Use the featured image section to add a featured image to your page.
- Once you are done creating your page, click the “Publish” button to make it live on your website.
It is also important to keep in mind that pages can be organized into hierarchies, which is known as a parent-child relationship. For example, if you have a services page, you can create subpages under that for each individual service. This helps to keep your website organized and easy to navigate for your visitors.
Common types of pages that any website should have
- Home Page: The home page is the first page that visitors see when they land on your website. It should provide an overview of your business or organization and guide visitors to other sections of your website.
- About Us Page: The about us page provides background information about your business or organization, including its history, mission, values, and team members. This page can help establish credibility and build trust with visitors.
- Products/Services Page: This page showcases the products or services that your business offers. It should provide detailed information about each product or service, including pricing, features, and benefits.
- Testimonials/Reviews Page: Testimonials and reviews from satisfied customers can help build trust and credibility with potential customers. This page should include quotes, photos, and other details that demonstrate the value of your products or services.
- Contact Us Page: The contact us page provides visitors with a way to get in touch with your business or organization. It should include a contact form, phone number, email address, and physical address.
- Blog: A blog is a great way to share news, insights, and other information with your audience. It can help establish your business as a thought leader in your industry and attract new visitors to your website.
- FAQ Page: Frequently Asked Questions (FAQ) pages can help address common questions and concerns that potential customers may have. This page should provide clear, concise answers to common questions, such as shipping policies, payment options, and returns.
- Privacy Policy Page: A privacy policy page outlines how your business collects, uses, and protects personal information. This page is required by law in many jurisdictions and can help build trust with visitors who are concerned about privacy.
- Terms and Conditions Page: A terms and conditions page outlines the rules and guidelines that visitors must follow when using your website. This page can help protect your business and establish clear expectations for visitors
Furthermore, WordPress provides the ability to use page templates, which are pre-designed page layouts that can be applied to specific pages. This allows you to have consistent page designs across your website and can help you to save time when creating new pages.
Creating posts
- Posts are dynamic elements of a website that are typically used for blog content or other types of content that are updated regularly. To create a new post, navigate to “Posts” on the WordPress dashboard and click “Add New.” You can add a title, content, and relevant media from there.
In WordPress, posts are the entries listed in reverse chronological order on the blog or news section of a website. Each post typically contains a title, content, and metadata such as the author name, date, and category. Creating posts in WordPress is a straightforward process, and here are some steps to follow:
- Log in to your WordPress dashboard and navigate to the Posts section.
- Click on the Add New button to start creating a new post.
- Enter a title for your post in the title field.
- Add content to your post using the editor. You can add text, images, videos, and other media to your post.
- Add relevant tags and categories to your post to help users find it easily.
- Preview your post and make any necessary edits.
- When you’re ready to publish your post, click on the Publish button.
It’s essential to keep your posts engaging and informative to keep your audience interested. Your posts should be well-structured, easy to read, and have relevant headings and subheadings to help readers scan the content quickly.
Additionally, creating regular and high-quality posts can also help improve your website’s search engine rankings, drive more traffic to your site, and establish your authority in your industry or niche. Therefore, developing a content strategy and sticking to a consistent publishing schedule is crucial to achieving your website’s goals.
- Editing pages and posts: To edit an existing page or post, navigate to “Pages” or “Posts” on the WordPress dashboard and click on the page or post you want to edit. From there, you can make changes to the content, add new media, or make other adjustments.
- Organizing pages and posts: WordPress allows you to create hierarchies of pages and organize them into menus for easier navigation. To do this, you can use the “Parent” option when creating or editing a page. You can also create categories and tags for posts to help organize them and make them easier to find for visitors.
- Using page builders: Page builders are tools that allow you to create custom pages using drag-and-drop interfaces, without needing to know any coding. WordPress has several popular page builders plugins, such as Elementor and Beaver Builder, that can help you create custom pages quickly and easily. We recommend Elementor, Elementor is the friendliest page builder, which can help you build a website quickly and easily. Moreover, you will get Elementor at a great price when you use the below link for purchasing Elementor.
Creating and editing pages and posts is important in building a WordPress website. It allows you to provide valuable information to your visitors and keep your website up to date with fresh content.
Installing and activating plugins
WordPress plugins are additional software components that can be added to a WordPress site to add functionality or features. Plugins are an easy and efficient way to enhance the functionality of a website without having to know how to code. As per current estimate there are over 65K plugins in the current WordPress plugin directory.
Here are some points to expand on the topic of installing and activating plugins:
- Definition of WordPress Plugins: A plugin is a software component that can be installed on a WordPress site to add new features or functionality. These plugins are developed by independent developers and can be found in the official WordPress plugin repository or from third-party providers.
- The importance of plugins: Plugins can help website owners extend the functionality of their site without having to know how to code. For example, there are plugins available for everything from contact forms, to social media integration, to SEO optimization, to eCommerce.
- How to find plugins: The easiest way to find plugins is to go to the WordPress dashboard, click on “Plugins” in the left-hand menu, and then click “Add New”. This will bring up a search bar where you can search for plugins by keyword or browse through popular and recommended plugins.
- Choosing the right plugins: When choosing plugins, it’s important to read the reviews and check the compatibility with your WordPress version. Also, make sure to choose plugins from reputable developers to avoid security risks.
- How to install and activate a plugin: To install a plugin, click “Install Now” from the search results or upload a plugin from your computer. Once the plugin is installed, click “Activate” to enable the plugin on your site.
- Managing plugins: It’s important to keep plugins up to date for security and compatibility reasons. To manage plugins, go to the “Plugins” section in the WordPress dashboard, where you can activate, deactivate, update, and delete plugins.
- Popular WordPress plugins: Some of the most popular WordPress plugins include Yoast SEO, Jetpack, Contact Form 7, WooCommerce, and WPForms. We recommend below set of plugins for your website.
o Backup: UpdraftPlus
o SEO: Rank Math SEO
o Forms: WPForms
o Security: Defender security
o Page builder: Elementor
By using plugins, WordPress site owners can add new features and functionality to their site with ease, without having to write a single line of code.
Customizing the header and footer
The header and footer of your WordPress website play an important role in creating a consistent and professional-looking design. The header usually contains your logo, navigation menu, and sometimes additional elements like a search bar or social media icons. The footer, on the other hand, is typically where you can find links to important pages, copyright information, and sometimes widgets or other content.
Here are some tips for customizing the header and footer of your WordPress website:
- Choosing a theme with customizable header and footer areas: When selecting a WordPress theme, look for one that offers the ability to customize the header and footer areas. Some themes may have pre-built header and footer templates, while others may offer drag-and-drop interfaces or other customization options.
- Creating a custom logo: Your logo is often the centerpiece of your website’s header, so it’s important to create a professional and memorable design. You can create a custom logo using design software like Adobe Photoshop or Canva, or hire a professional designer to create one for you.
- Customizing the navigation menu: Your website’s navigation menu is typically located in the header area and allows visitors to easily navigate your site’s pages and content. In WordPress, you can customize the navigation menu by adding or removing pages, reordering menu items, and changing the styling.
- Adding additional header content: Depending on your website’s goals and design, you may want to add additional content to your header, such as a search bar, social media icons, or a call-to-action button. WordPress offers a variety of plugins and widgets that can help you add these elements to your header.
- Customizing the footer: Similar to the header, your website’s footer can also be customized to include important information and links. WordPress allows you to add widgets to the footer area, such as a newsletter signup form, social media feeds, or other content.
By customizing the header and footer of your WordPress website, you can create a cohesive and professional-looking design that helps to build brand recognition and trust with your visitors.
Optimizing the Website
Understanding Search Engine Optimization (SEO)
Search engine optimization (SEO) is the practice of improving the quantity and quality of traffic to a website from search engines through organic search results. The goal of SEO is to improve a website’s visibility and ranking on search engine results pages (SERPs) for relevant keywords or phrases.
SEO involves a range of techniques, including optimizing website content, improving website speed and performance, using relevant keywords and phrases, building high-quality backlinks, and optimizing website metadata such as page titles, descriptions, and URLs.
Search engines use complex algorithms to determine the relevance and authority of a website’s content and rank it accordingly. By optimizing your website for search engines, you can improve your visibility and reach more potential customers.
Some key elements of SEO include:
- Keyword research: identifying relevant keywords and phrases that your target audience is searching for.
- On-page optimization: optimizing website content, metadata, and HTML tags to improve search engine visibility.
- Off-page optimization: building high-quality backlinks from other websites to improve authority and credibility.
- Technical optimization: optimizing website speed and performance, mobile-friendliness, and ensuring proper website structure.
- Content marketing: creating and promoting high-quality, relevant content to attract and engage website visitors.
- Analytics and reporting: measuring and analyzing website traffic, engagement, and other key performance indicators to continually improve SEO strategy.
How to Optimize content for search engines
Optimizing content for search engines is an essential aspect of creating a successful website. Here are some ways to optimize your content:
- Conduct keyword research: Start by identifying the keywords and phrases that people are searching for related to your business or industry. Use keyword research tools like Google Keyword Planner or SEMrush to identify the most relevant and high-traffic keywords.
- Use keywords in your content: Once you have identified your keywords, use them strategically in your content, including page titles, headings, subheadings, and throughout your content. But be careful not to stuff your content with too many keywords, which can lead to penalties from search engines.
- Write high-quality content: Creating high-quality content that provides value to your audience is critical. Your content should be informative, engaging, and easy to read.
- Optimize images: Images can help to break up text and make your content more visually appealing. However, they can also slow down your site if they are not optimized. Use descriptive file names and alt text for your images and compress them to reduce their file size.
- Use internal linking: Internal linking helps search engines understand the structure of your site and the relationship between different pages. It also helps users navigate your site and find related content.
- Use meta descriptions: A meta description is a brief summary of your page that appears in search results. It should be concise, informative, and include your target keywords.
- Make your site mobile-friendly: With more people using mobile devices to browse the web, it’s essential to ensure that your site is optimized for mobile. Use a responsive design that adjusts to different screen sizes and ensures that your site loads quickly on mobile devices.
Optimizing images for search engines
Optimizing images for search engines is an essential aspect of optimizing content for search engines. It involves the use of techniques to make sure that the images on your website are easily found and indexed by search engines.
Here are some steps you can take to optimize images for search engines:
- Choose the right image format: Use the JPEG format for images with lots of colors and the PNG format for images with fewer colors.
- Use descriptive file names: Rename your image files using descriptive keywords that are relevant to the content of your website.
- Compress your images: Use an image compression tool to reduce the size of your images without losing quality. Smaller images load faster, which improves your website’s loading speed and can improve your search engine rankings.
- Use alt tags: Include descriptive alt tags for all your images. Alt tags provide search engines with a description of the image, making it easier for them to understand the content of your website.
- Use relevant captions: Include relevant captions for your images that accurately describe what the image is about.
- Include images in your sitemap: Add your images to your website’s sitemap. This makes it easier for search engines to find and index your images.
We recommend using Canva a free-to-use online graphic design tool. Use it to create social media posts, presentations, posters, videos, logos, images for your website and more.
Adding more functionality to your own website
Adding forms to the website
Adding forms to a website is essential as it helps visitors to get in touch with the website owner /business owner for various purposes like submitting a query, leaving feedback, or subscribing to a newsletter. WordPress allows website owners to add forms easily, either through plugins or without plugins. Here are the steps to add forms to a WordPress website without a plugin:
- Create a new page or post in WordPress where the form will be added, most of the time this will be on the Contact us page.
- Click on the “+” button on the left-hand side of the editor and search for “Form”.
- Select the “Form” block and choose a form template that suits your requirements.
- Once the template is selected, the form will be added to the page/post. You can customize the form by clicking on it and using the form settings on the right-hand side of the editor.
- To add form fields, click on the “Add Field” button, and select the type of field you want to add (e.g., Name, email, phone number, message, etc.).
- Customize the field options and label them as per your requirement.
- To edit the form submission settings, click on the form block and then click on the “Open in Form Builder” button. This will open the form settings where you can customize the email notification settings, Google reCAPTCHA.
Adding forms to a WordPress website without a plugin is a simple process that can be completed in a few easy steps. It allows website owners to create custom forms that suit their requirements and enhance user engagement.
Adding a shopping cart and payment gateway
Adding a shopping cart to a website is an essential step for businesses that plan to sell products online. Fortunately, WordPress provides a variety of options for adding a shopping cart to your website.
- Install an eCommerce Plugin: One of the most popular options is to install an eCommerce plugin like WooCommerce, which is free and user-friendly. This plugin provides many features such as payment gateways, tax options, shipping methods, product management, and order management.
- Choose a Payment Gateway: Once you have installed an eCommerce plugin, the next step is to choose a payment gateway to process payments from your customers. Popular payment gateways include PayPal, Stripe, and Authorize.net.
- Add Products: Once you have set up your payment gateway, it’s time to start adding products to your online store. This is done through the product management feature provided by the eCommerce plugin. You can add product descriptions, prices, images, and more.
- Set Up Shipping: If you plan to sell physical products, you will need to set up shipping methods. This can be done through the shipping settings provided by the eCommerce plugin.
- Customize the Shopping Cart: Once you have set up your shopping cart, you can customize it to fit your website’s design. This can be done through the theme settings or by using custom CSS.
- Test the Shopping Cart: Before launching your website, it’s important to test your shopping cart to make sure everything is working properly. Test the entire checkout process, including adding products to the cart, entering payment information, and completing the order.
Adding a shopping cart to your WordPress website may seem like a daunting task, but with the right plugin and a bit of customization, you can easily set up an online store and start selling your products to customers around the world.
Adding social media sharing buttons
Adding social media sharing buttons to your website is a great way to increase engagement and promote your content on various social media platforms. Here are some steps to follow:
- Choose the social media platforms you want to include: Depending on your business or blog, you may want to include buttons for Facebook, Twitter, Instagram, LinkedIn, Pinterest, and other platforms.
- Find a social media sharing plugin: WordPress has many plugins available for adding social media sharing buttons. Some popular options include Social Media Share Buttons & Social Sharing Icons, MashShare, and Shareaholic.
- Install and activate the plugin: Once you’ve chosen a plugin, you can install it directly from the WordPress plugin directory. Once installed, activate the plugin.
- Configure the plugin settings: Most social media sharing plugins will have settings that allow you to choose which platforms to include, where to display the buttons, and what they should look like.
- Add the social media sharing buttons to your website: Depending on the plugin you’re using, you may need to add a shortcode to the pages or posts where you want the buttons to appear. Alternatively, some plugins may add the buttons automatically to all pages and posts.
- Test the buttons: After adding the social media sharing buttons, make sure to test them on your website to ensure they are working properly.
By following these steps, you can easily add social media sharing buttons to your website and encourage your visitors to share your content with their social media networks.
Conclusion & way forward
In conclusion, creating a website with WordPress can seem like a daunting task, but it is an achievable goal. With the right tools, resources, and guidance, anyone can create a professional-looking website for their business, blog, or personal use.
- Recap of the steps to create a website with WordPress:
- Choose a domain name and web hosting provider.
- Install WordPress on your web hosting account.
- Choose and install a WordPress theme.
- Customize the theme to fit your website’s branding.
- Create pages and posts for your website’s content.
- Install and activate plugins to add extra functionality to your website.
- Optimize your website for search engines.
- Add forms, shopping carts, and social media sharing buttons to your website.
If you have been considering creating a website with WordPress, there is no better time to start than now. With the knowledge gained from this guide and the resources available, you can have your website up and running in no time. Don’t be afraid to experiment and try new things as you build your website. Remember, the more effort you put into your website, the better it will be in the long run. Good luck on your website creation journey!